MeteorMan将在本文针对自然语言处理领域的新兴BERT模型进行部署介绍,使其真正应用到工业界的生产环境中。
1.模型训练
可以根据该仓库的介绍训练出一个BERT分类模型,而后基于exported脚本将模型导出为Saved_Model格式。
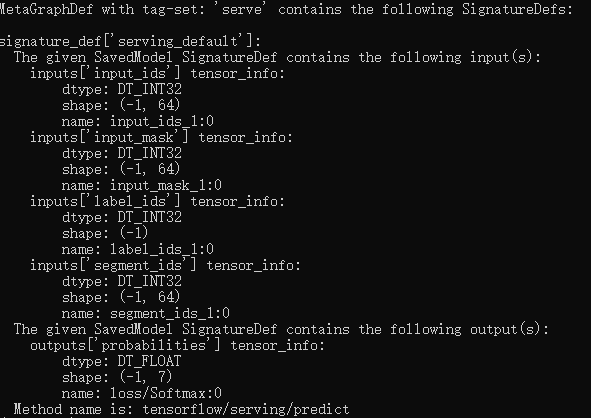
然后可以利用saved_model_cli命令来探索该模型的输入输出结构(该命令需要切换包含tensorflow的python环境下才可正确执行):
saved_model_cli show --dir your_path_to_model --all
注意,此处‘your_path_to_model’可以为包括时间戳的相对路径,例如‘exported_domain_classify/1574821100/’。
执行命令后,会显示如下信息:
2.模型部署
本文是基于tf-serving机制来部署模型的。总的来说,模型部署可以分为三步:
(1)环境配置
(2)模型服务开启
(3)调用请求
2.1环境配置
MeteorMan在本文测试中所采用的的环境为Ubuntu16.04+Python3.6+tf1.14.0。
有了上述环境后,在系统中安装tensorflow-model-server:
apt-get install tensorflow-model-server
如果出现错误提示:“E: 无法定位软件包 tensorflow-model-server”,使用下述命令:
echo "deb [arch=amd64] http://storage.googleapis.com/tensorflow-serving-apt stable tensorflow-model-server tensorflow-model-server-universal" | sudo tee /etc/apt/sources.list.d/tensorflow-serving.list
curl https://storage.googleapis.com/tensorflow-serving-apt/tensorflow-serving.release.pub.gpg | sudo apt-key add -
sudo apt-get update && sudo apt-get install tensorflow-model-server
安装完毕!
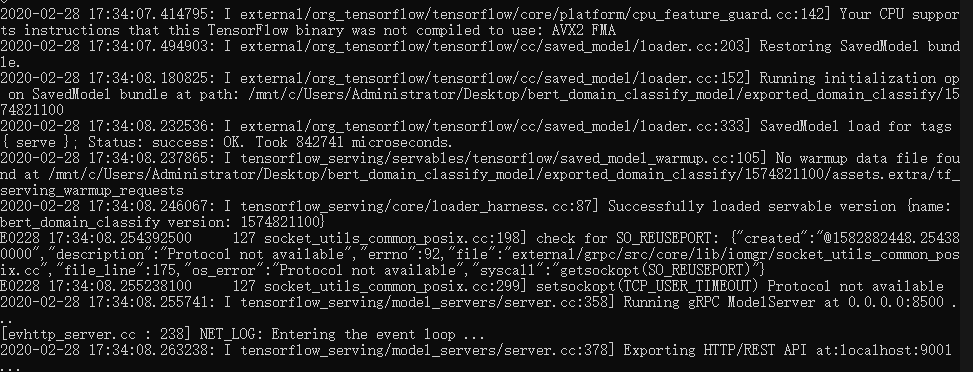
2.2模型服务开启
使用如下命令即可开启服务:
tensorflow_model_server --rest_api_port=9001 --model_name=bert_classify --model_base_path=your_absolute_path_to_exported_model
Note:此处可以增加参数“–enable=true”:传入批量数据
命令执行之后,会出现以下信息:
2.3调用请求
在调用请求时,主要存在两种方式:curl和python-requests。
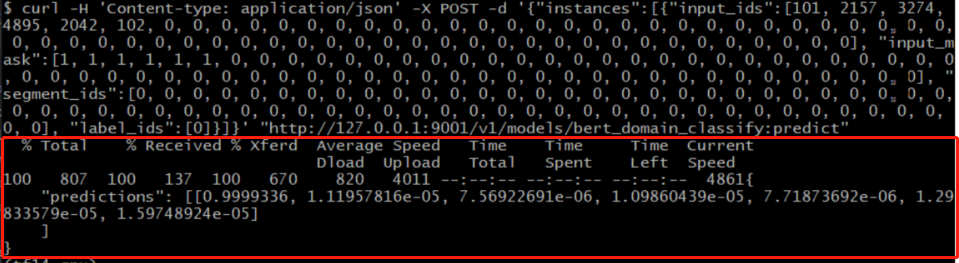
2.3.1 curl
curl命令在Linux中非常强大,可按照如下命令执行:
curl -H 'Content-type: application/json' -X POST -d '{"instances":[{"input_ids":[101, 2157, 3274, 4895, 2042, 102, 0, 0, 0, 0, 0, 0, 0, 0, 0, 0, 0, 0, 0, 0, 0, 0, 0, 0, 0, 0, 0, 0, 0, 0, 0, 0, 0, 0, 0, 0, 0, 0, 0, 0, 0, 0, 0, 0, 0, 0, 0, 0, 0, 0, 0, 0, 0, 0, 0, 0, 0, 0, 0, 0, 0, 0, 0, 0], "input_mask":[1, 1, 1, 1, 1, 1, 0, 0, 0, 0, 0, 0, 0, 0, 0, 0, 0, 0, 0, 0, 0, 0, 0, 0, 0, 0, 0, 0, 0, 0, 0, 0, 0, 0, 0, 0, 0, 0, 0, 0, 0, 0, 0, 0, 0, 0, 0, 0, 0, 0, 0, 0, 0, 0, 0, 0, 0, 0, 0, 0, 0, 0, 0, 0], "segment_ids":[0, 0, 0, 0, 0, 0, 0, 0, 0, 0, 0, 0, 0, 0, 0, 0, 0, 0, 0, 0, 0, 0, 0, 0, 0, 0, 0, 0, 0, 0, 0, 0, 0, 0, 0, 0, 0, 0, 0, 0, 0, 0, 0, 0, 0, 0, 0, 0, 0, 0, 0, 0, 0, 0, 0, 0, 0, 0, 0, 0, 0, 0, 0, 0], "label_ids":[0]}]}' "http://127.0.0.1:9001/v1/models/bert_classify:predict"
其中服务URL为以下格式:
http://服务器地址:端口号/v1/models/模型名:predict
执行上述命令后,显示如下信息:
2.3.2 python-requests
使用python的requests库来调用部署的模型接口,关键代码如下所示:
import time
question = input("> ")
start_time = time.time()
predict_example = InputExample("100", question, None, '婚姻家庭')
feature = convert_single_example(100, predict_example, label_list, max_seq_length, tokenizer)
data = json.dumps({
    "instances": [
        {
            "input_ids": feature.input_ids,
            "input_mask": feature.input_mask,
            "segment_ids": feature.segment_ids,
            "label_ids": [feature.label_id]
        }
    ]
})
headers = {"content-type": "application/json"}
json_response = requests.post(
    'http://127.0.0.1:9001/v1/models/bert_domain_classify:predict',
    data=data, headers=headers)
end_time = time.time()
print('Spend time {}sec'.format(end_time-start_time))
predictions = np.array(json.loads(json_response.text)['predictions'])
# print(np.argmax(predictions, axis=-1))
label = label_list[predictions.argmax()]
print(label)

该方式对应的完整代码可去该处查看。